Some teams within FSFE use a support ticket system for the handling of external requests and for internal processes. FSFE maintains an OTRS instance at https://tickets.fsfe.org/ for this purpose.
Some more technically oriented teams use the issue tracker built into FSFE's git server for bug and feature request handling.
Also available: A quick guide to ticket dispatching.
Contents
Teams using the ticket system
Shipping Team: Extensively
Financial Team: Extensively
HR team: Handling of job applications including internships
System-Hackers: Handling of technical questions and problem reports
Staff and volunteers: Handling of inquiries to the general contact address
Various campaign teams: Handling of signatures for open letters, petitions, declarations etc.
Legal Team: Handling of speaker submissions for the Legal and Licensing Workshop
If you as a team want to start using the ticket system, please send an email to contact@fsfe.org and we'll discuss how to implement it.
Getting access
If you are a member of a team which uses the ticket system for its work, and you want to help with the tickets, just let your team coordinator know, who will make sure the ticket system administrators activate your login.
Terms and concepts
A ticket represents a task to be fulfilled. All communication around this task is stored within the ticket. A ticket can be for example a question asked at contact@fsfe.org, a merchandise order, a request to sign an open letter, or a speaker submission to the Legal and Licensing Workshop.
A queue is a container where tickets of similar kind are collected. For example, there is one queue which contains all merchandise orders, and there is another queue which contains all signature requests, and so on. There also is the Raw queue for tickets that manually must be sorted into one of the other queues, the Misc queue where all tickets go which don't fit anything else, and the Junk queue for spam. Each queue is assigned to a team within FSFE and only accessible by the members of that team. Queues can be organised hierarchically, meaning that any queue can have sub-queues.
The customer of a ticket is the person (in most cases from outside the FSFE) who initiated the request, for example the person who ordered merchandise, wants to sign the open letter, or asked the question on contact@fsfe.org. Even though FSFE is not a company, we'll use the term “customer” throughout this document.
The owner of a ticket is the person within FSFE who currently works on the ticket. In this document, we'll use the term “your tickets” for “all the tickets where you are the owner”.
The ticket has a lock if the owner has actually taken (or been assigned) responsibility for that ticket. In FSFE's configuration of OTRS, all locked tickets have an owner, and all unlocked tickets have no owner (indicated through the text “Admin OTRS”).
The ticket state new means that the customer has not yet received any feedback on that ticket.
The ticket state open means that there already has been some communication with the customer, but the ball lies in FSFE's field. This includes tickets that have already been closed, but later the customer has sent another followup.
The ticket state pending reminder means that the ball lies in the customer's field. For all tickets of this status, an alarm clock is set to remind the owner (and others) about the issue in case the customer does not react within the time you'd have expected.
The ticket state closed successful means that the task is finished with a positive outcome, for example the question was answered, the merchandise was sent, or the speaker submission was accepted.
The ticket state closed unsuccessful means that the task is finished with a negative outcome, for example we weren't able to answer the question, the merchandise was sold out, or the speaker submission was declined.
A ticket is escalated if the last communication with the customer (in either direction) is “too long ago” (that is, nothing has happened about the ticket for “too long”), where the ticket system administrator defines for each queue what “too long” means in hours or days. For most queues, the escalation threshold is one week.
Basic use
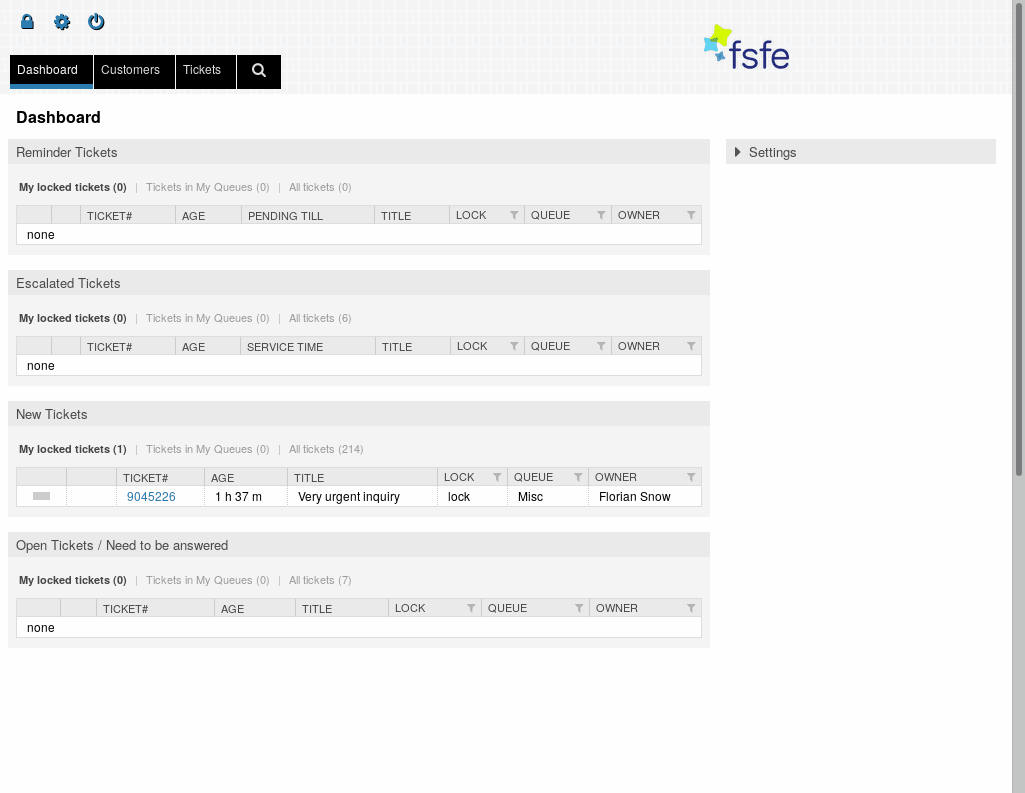
Finding tickets which require your attention
After login, you see a screen called “Dashboard”, and you can always return to this screen by clicking on the “Dashboard” button at the top left.
On the dashboard, you see four important blocks in which tickets are displayed which require your attention:
Reminder Tickets lists all tickets where the ball is in the customer's field, but the customer has not reacted within the expected period. For such tickets, it's usually recommendable to send a reminder to the customer or otherwise set measures to move the issue forward.
Escalated Tickets lists all tickets where nothing happened for too long. A ticket listed there usually needs attention with high priority. Please note that all escalated tickets usually are listed in one of the other blocks as well.
New Tickets lists all tickets where the customer has not yet received any feedback.
Open Tickets lists all tickets where there already has been some communication with the customer, but the ball still lies in FSFE's field.
In each of these blocks, you can select one of three filters which represent the priority of the tickets for you personally:
My locked tickets displays those tickets for which you currently have the responsibility. These are the highest priority for you, everybody else in your team will expect that you take care of them.
Tickets in My Queues displays all tickets in the queues you are specially interested in. If you have resources available beyond what you need to handle your already locked tickets, you can find tickets suitable for you to take over by looking at those marked "unlock". But even for the tickets marked "lock", the ticket owner might be happy about your help. If you are the coordinator of a team, it is especially important that you keep an eye on these lists.
All tickets displays all tickets which you can access. This is low priority for you personally, but still you might find something of interest for you.
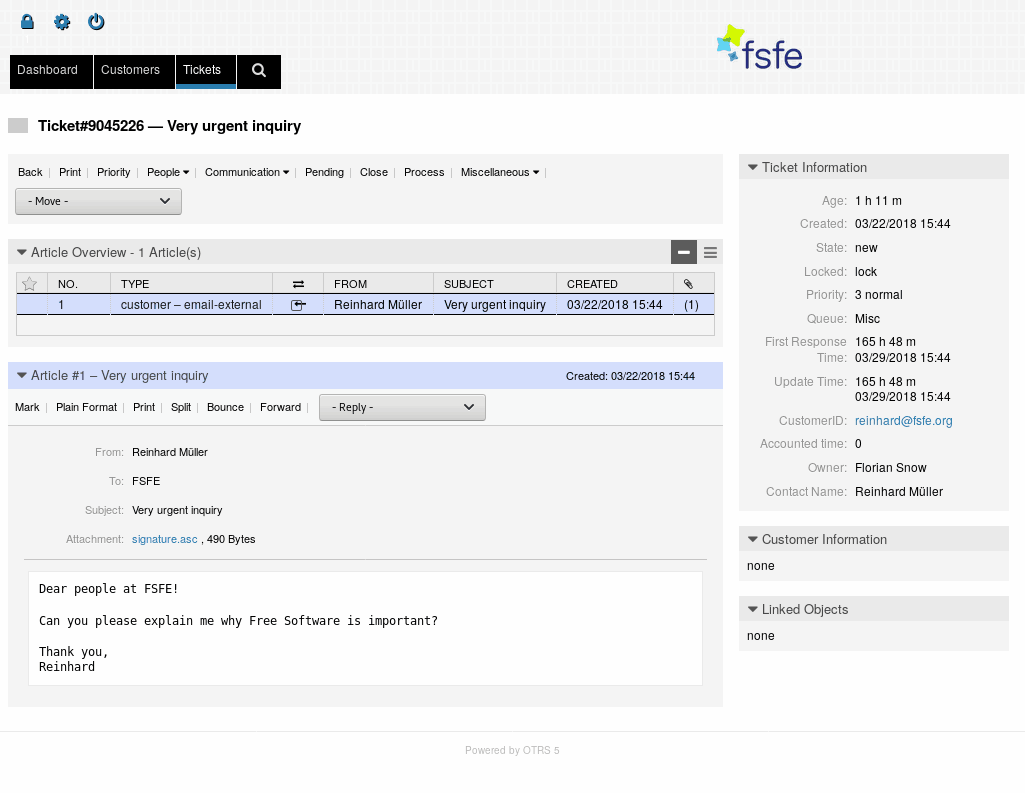
Exploring a ticket and basic ticket operations
When you click of any of the tickets in the dashboard (or in any other view where tickets are listed), you get detailled information about the ticket.
The “Ticket view” is split into several parts:
- The header line shows the ticket number and the title of the ticket (usually taken from the subject of the last email that was received from the customer).
- The ticket menu bar enables you to select operations concerning the ticket as a whole. The most important operations are:
People - Owner lets you assign the ticket to somebody else. The new owner receives a notification about this by email. You can also use this to claim responsibility for a ticket which is currently locked by somebody else, but you would only do this if you are sure that this other person doesn't really work on the ticket.
Communication - Note lets you add an internal note to the ticket.
Pending lets you put the ticket into state “pending reminder” (including an alarm clock setting) without actually replying to the customer. You can optionally add a note in the process, please consider doing this if it is not obvious what you are waiting for. Selecting this menu item will implicitly assign the ticket to you. Please note that you cannot change the state of tickets locked by other users.
Close lets you close the ticket, marking the task behind it as finished, without actually replying to the customer. You can optionally add a note in the process, please consider doing this if it is not obvious why you consider the task finished. In some specialized queues (of the shipping team), an automatic notification will be sent to the customer when you set the ticket state to “closed successful”. Please note that you cannot change the state of tickets locked by other users.
Move lets you move the ticket into a different queue. At the same time, it will remove any lock that might be on the ticket, making it available to take over for the team behind the new queue. Please note that you cannot move tickets locked by other users.
The Article Overview lists all emails exchanged regarding this ticket and all notes, oldest on the top, and with those which you haven't read yet in bold printing. The colors give you a quick overview:
- blue for emails sent from the customer to FSFE
- green for emails sent from FSFE to the customer
- yellow for system-generated emails
- red for internal notes
- The block below shows the details of the article (email or note) which is selected in the article overview. It also contains a menu bar with operations specific to this article; the most important of these operations is replying to an email, which will be covered in the next section.
The Ticket Information box to the right shows all kind of metadata about the ticket. It also shows how much time is left before the ticket escalates.
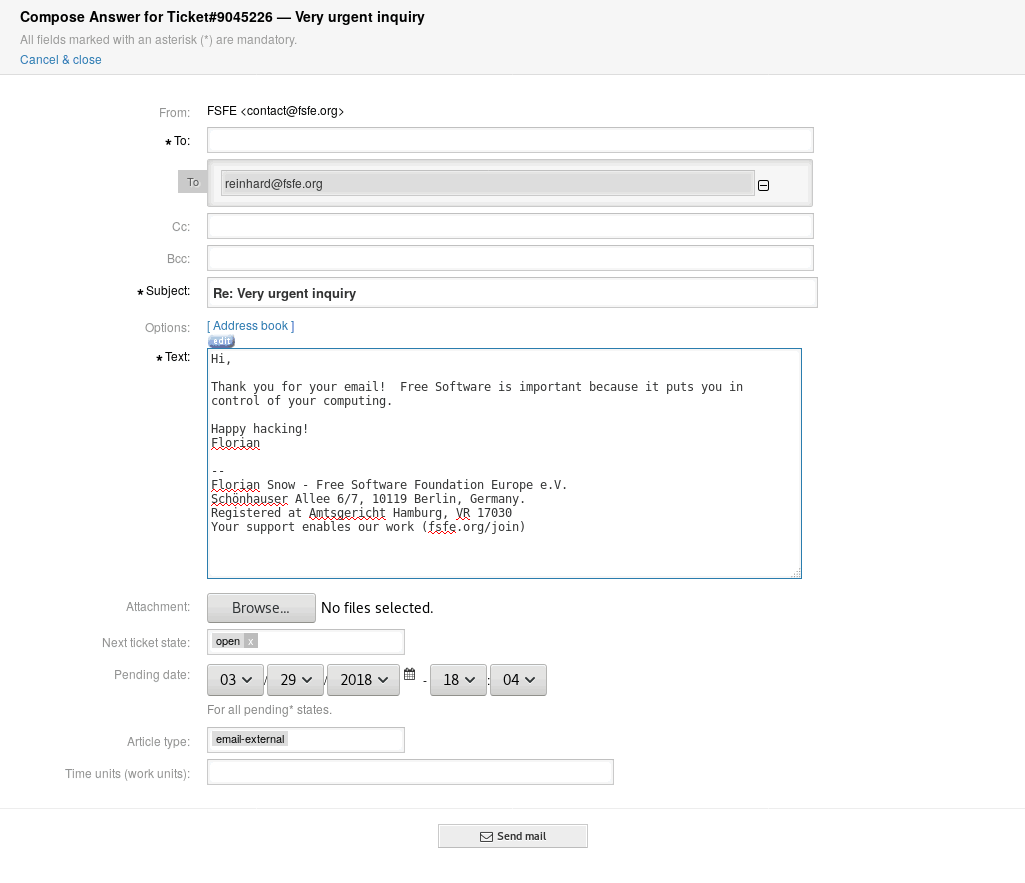
Sending a reply
It is important that you send outgoing emails related to tickets only within the ticket system, so the email will be visible within the ticket for everybody.
When you want to send a reply to an email, first select the previous email you want to reply to within the ticket's article overview, then click on the "Reply" or "Reply to all" button. You can select to start with an empty reply or already fill in one of the boilerplate texts available for the ticket's queue. If you want to have the boilerplate texts changed or extended, please contact the OTRS administrator.
Like in any other email client, you can add more recipients in the To:, Cc:, and Bcc: fields, edit the actual email body, and attach files to the email.
Now before sending the email, take care to update the ticket state, according to the following guidelines:
Use closed successful if with this email, you consider the task completed. Examples: the ordered merchandise has been sent out, the question has been answered, the intern has been accepted and everything is prepared.
Use closed unsuccessful if with this email, you cancel the task. Examples: the ordered merchandise is already sold out, the internship application has been declined, the speaker submission is refused.
Use open if (and only if!) after this email, the ball remains in FSFE's field. Examples: you just wrote an email telling the customer that it will be another week before you can take care of the issue.
Use pending reminder if after this email, you have to wait for a reply or some other event before you can continue to work on it. At the same time, choose the date and time for the alarm clock which will bring the ticket back to your attention if nothing happens until then. Examples: you need an answer, the internship applicant should send documents, the donor has announced to send a donation.
Do not forget to update the ticket state. For you (and others!) to be able to find tickets needing your attention, it is essential that the state of each ticket is accurate.
Receiving followups
If the customer sends a followup to a ticket of state “pending reminder”, it is set to state “open”, so it will again be brought to the attention of the owner and the people watching the queue.
If the customer sends a followup to an already closed ticket, it is also set to state “open” and at the same time locked for the last owner it had, assuming that whoever closed the ticket should handle this followup. Sometimes people just send a "thank you" after you've closed the ticket, in that case you can simply close the ticket again directly in the ticket view.
Personal configuration

You can reach the configuration view by clicking on the cogwheel symbol at the top of the OTRS browser window. You will want to set your preferences for the following settings:
Language
My Queues: Put the queues there which are of special interest for you. You will see tickets from these queues in the Dashboard when you use the “Tickets in my queues” filter, and you will receive some email notifications about tickets in these queues.
Ticket notifications: Select about which events you want to be informed by email.
Ticket creation notification: Generated when a new ticket is created in one of your queues, or a ticket is moved into one of your queues.
Ticket escalation notification: Generated when one of your tickets escalates, i.e. too much time since the last external communication within thefo ticket has passed.
Ticket follow-up notification (locked): Generated when one of your tickets receives a followup from the customer.
Ticket follow-up notification (unlocked): Generated when an unlocked ticket (i.e. currently not handled by anybody) in one of your queues receives a followup from the customer.
Ticket new note notification: Generated when a new internal note is added to one of your tickets.
Please note that each box has its own “Update” button which must be used to save the settings of this box.
Browsing and searching tickets
The most useful tools to browse through tickets are the following:

Browsing through your locked tickets
You get a list of your locked tickets when you click on the lock symbol at the top of the OTRS screen. In the grey bar, you can select between 4 subsets:
All lists all your locked tickets.
New Article lists all your locked tickets where a new article (email or internal note) exists which you haven't read yet. If such tickets exist, you'll generally see a lock symbol with a star at the top of the OTRS screen, which is a shortcut to this list.
Pending lists all your locked tickets in state “pending reminder” where the alarm clock hasn't rung yet. This list is especially useful if you're waiting for some event external to OTRS rather than for a reply from the customer.
Reminder Reached lists all your locked tickets in state “pending reminder” where the alarm clock has already rung. If such tickets exist, you'll generally see a lock symbol with a clock at the top of the OTRS screen, which is a shortcut to this list.
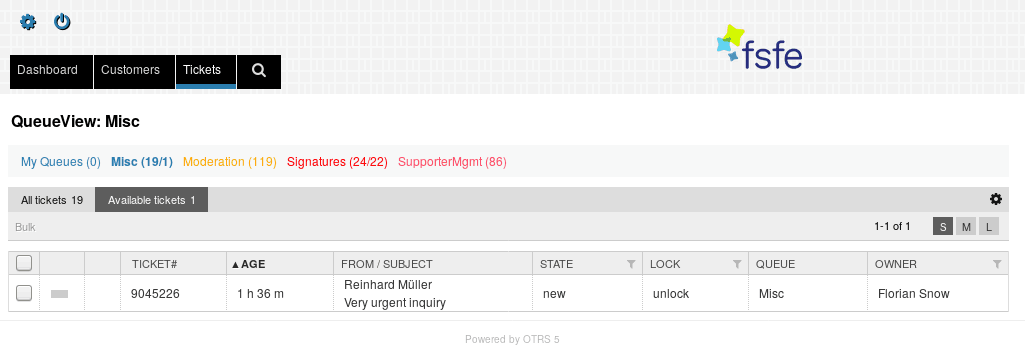
Browsing a ticket queue
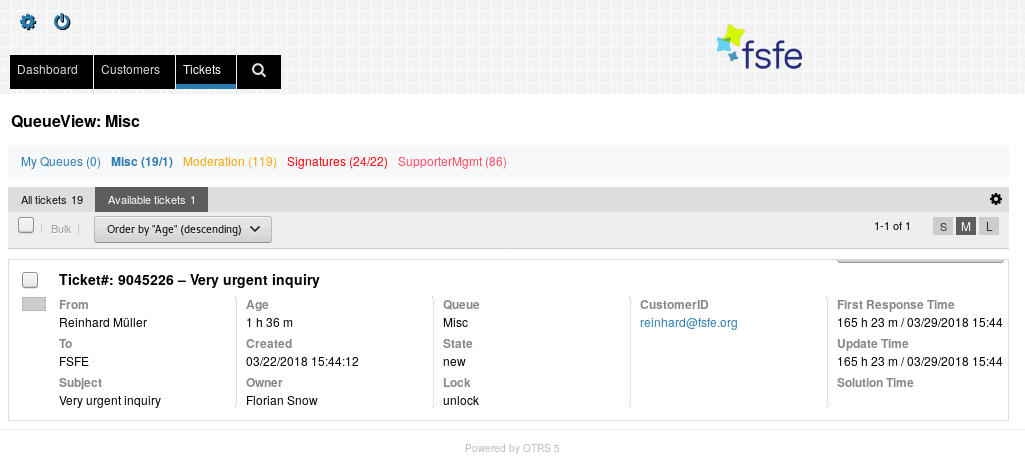
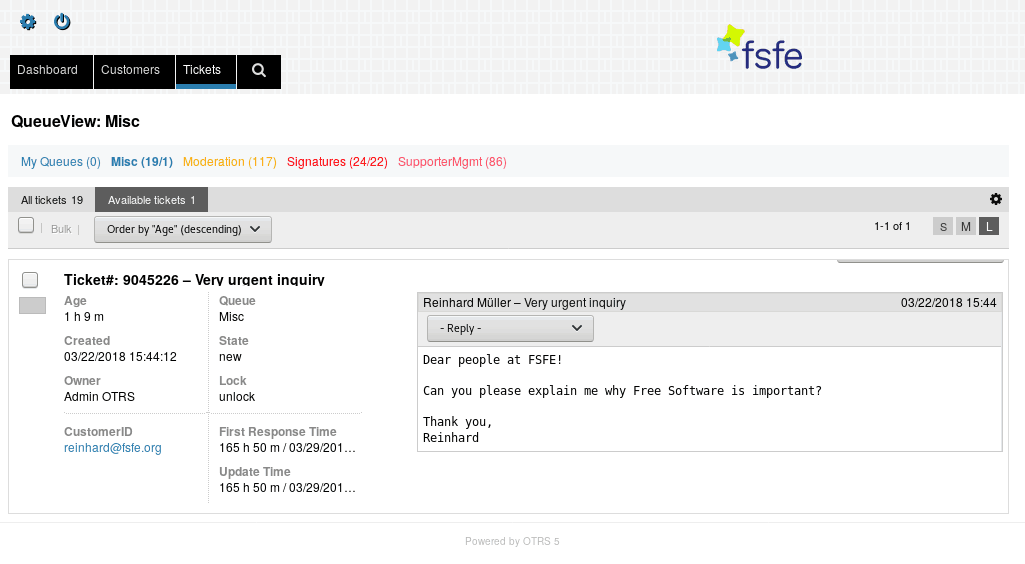
You can see all the tickets in a queue when you click on the “Tickets” button at the top of the OTRS screen and then select the queue you want to examine.
If a queue contains unlocked tickets (i.e. tickets for which nobody has taken responsibility) older than 24 hours, the queue name is displayed in yellow, and after 48 hours, it turns red.
The numbers behind the queue name indicate the total count of tickets in that queue (including subqueues) and the count unlocked tickets.
If you repeatedly click on the same queue name, you toggle between whether or not tickets from subqueues should be included in the list.
In the grey bar, you can again select between two subsets:
All tickets lists all the tickets in the queue.
Available tickets lists only the unlocked tickets - tickets which would be available for you to take responsibility of.
Searching for tickets
When you click on the button with the magnifying glass symbol at the top of the OTRS screen, you can do a full-text search through all tickets.
Browsing options
All the above lists offer three different display variants which can be selected at the top right of the list:
Small
In the most compact view, you can click on any column header to sort by this column. Some column headers also display a funnel symbol; clicking on that gives you the opportunity to filter the list by that column. Please be aware that these settings get stored, so if you want to reset to a non-filtered view, simply click on the trashbin symbol at the top right of the list.
Medium
In the medium view, you see all available metadata about the ticket, but you don't have the flexible options for sorting or filtering as you have with the small view. On the other hand, whenever you move the mouse into a ticket's area on the screen, you receive a menu with some important operations for the ticket, so you can apply these operations without actually opening the ticket.
Large
In the most verbose view, you see the ticket metadata and a list of articles (emails and internal notes), with the last article being unfolded. You can unfold older articles by clicking on their line in the list. Again, some operations are availabe through a menu popping up when you move the mouse over the ticket, and you can also initiate a replay to an article directly from this list.
Advanced operations
Declaring to be unavailable
If you are on vacation or not able to handle tickets for another reasons, it's a good idea to declare this in the ticket system, so nobody else assigns you an urgent ticket during that time. In the preferences view (which you get when you click on the avatar at the top left of the screen), go to personal preferences, and there declare that you're “out of office” with a start and end time.
Creating a new ticket
If you want to start a new ticket with an outgoing email rather than reacting on an incoming one, open the “Ticket” menu at the top of the OTRS screen and choose “New E-mail Ticket”.
Handling phone calls
In the ticket view, the menu “Communication” contains the items “Phone Call Outbound” and “Phone Call Inbound”. Use these items to add notes about phone calls to the ticket.
To start a new ticket with an outbound phone call, open the “Ticket” menu at the top of the OTRS screen and choose “New Phone Ticket”.
Withdrawing responsibility
There are two distinct possibilities to withdraw your responsibility for a ticket:
- Assign ownership to somebody else: In the ticket view, in the menu “People”, choose the item “Owner” and set the ownership to the person you want to pass responsibility to.
- Unlock the ticket: In the ticket view, in the menu “Miscellaneous”, choose the item “Unlock”.
Passing a ticket to somebody outside the ticket system
Sometimes a request has to be handled by a team which does not use the ticket system for its work. In this case, it is possible to pass the ticket to a mailing list or even a personal email address:
- Open the ticket.
- Select the article (email or internal note) which you want to pass on (usually it will be the only article in the ticket at all).
- From the article menu, select “Bounce”.
- Enter the email address to which you want to pass the request.
- Check the “Inform sender” checkbox.
- Adapt the text of the notification to your needs.
- Click on the “Send” button.
Merging tickets
You can merge two or more tickets into one. Use this, for example, if the customer sends a new email instead of replying to a previous one, so the ticket system cannot recognize that the email belongs to the old ticket and creates a new one.
To merge two tickets:
- Note the ticket number of the ticket you want to keep (usually the older one).
- Open the ticket you want to merge (usually the newer one).
- In the ticket menu, select “Miscellaneous” - “Merge”.
- Enter the ticket number you previously noted.
- Click on “Send”.
Splitting tickets
This is the opposite case: during the communication around a ticket, a topic came up which actually would justify to open a new ticket for handling it.
To split off a new ticket:
- Open the original ticket.
- Select the article (email or internal note) which should serve as the starting point for the new ticket.
- From the article menu, select “Split”.
- Choose the queue in which the new ticket should go.
- If you want, immediately assign the ticket to somebody (for example, to yourself).
- Enter a good subject. Note that this subject will be used as the title for the new ticket!
- If you want, modify the text, for example by removing parts irrelevant for the new ticket, or adding a remark by yourself.
- Select a ticket state for the new ticket (actually only “open” and “pending reminder” make any sense).
- Click on “Create”.
Bulk actions
Sometimes you want to apply an operation to many tickets at once. To do this, use any of the browsing options (My Locked Tickets view, Qeue view, Search) to get those tickets in a list, mark the checkbox at the very left for each ticket you want to touch, and then click on ”Bulk” at the top left of the list. Note that with doing this, you implicitly assign all these tickets to yourself. Now, you can change state and owner of the tickets, move them into another queue, merge all of them into a single ticket, even add a note to all of them, and on your choice automatically unlock all the tickets again after the operation was performed.
Please note that you cannot perform a bulk action on tickets that are locked by somebody else.
