This page has been moved to FSFE docs.
Contents
Common information
The workflow in Git is quite different from what you may be used to. This is because Git is decentralised. Every repository in Git is equal, but some repositories are more equal than others.
Before you start, make sure you have everything set up as described in TechDocs/Git/FirstSteps. Also make sure you understand basic Git commands as described in TechDocs/Git/FirstCommit.
This page explains two different scenarios.
A simple approach with direct edits to the Git repository. It's easier to understand but bears a few risks.
A more complex approach which involves forks and Pull Requests. This is safer and allows more checks. For example, we highly prefer this for changes on the fsfe.org website.
It will start with the simple approach which skips a lot of detailed information about the different aspects Git it built upon. If you don't understand something, please have a look into the complex approach, or skim external resources like the excellent Visual guide to version control and its following guides in the series.
Simple approach
This workflow reduces complexity by giving up the need of forks, extra branches and pull requests. While it's easier to learn, we require the complex approach for some repositories like the website because it's safer, more transparent and more reliable. Also, this method requires that you have at least write access to the repository.
In this example, it is assumed you would like to work on FSFE/share-buttons, an interesting but seldom used repository.
Basic knowledge
As with the complex workflow, you should rudimentally know about the scheme you are working with.
The Two Repositories
There are only two repositories you are working with:
The main remote repository or origin: https://git.fsfe.org/FSFE/share-buttons. This is the most important repository, because everyone has agreed that this is the "official" repository. You will directly be working on that.
Your local repository. This is the directory on your local computer. You also have complete control over this repository. Nothing you do in this repository affects any other repository until you push.
Branches
Unlike with the complex approach, branching will play no role in most repositories in which the simple workflow can be used. You will only work with the master branch which is the official "timeline" of the repository. Any change that you will make and upload to this branch will directly affect the local repositories of the others working on it as soon as they update to the latest status.
One-time preparations
In the following you'll find the steps which have to be execute only once per repository you want to work on. It is assumed that you successfully set up Git on your computer according to our recommendations.
Clone the repository to a place on your computer. Within a terminal, move to a location of your choice and execute git clone git@git.fsfe.org:FSFE/share-buttons.git. This will create a folder called share-buttons inside the directory your terminal has opened.
Workflow
After the one-time preparations, the following steps have to be execute in a terminal positioned in your local repository each time you would make an edit.
Before making any change, always do a git pull. This will update your local copy with the remote repository to get the latest changes.
- Now you can make any changes, e.g. create new files or edit existing ones. You can do that in your file browser.
Run git status to be presented with a list of edits you have done. This can be executed any time and will help you to understand the difference between the official status and your own edits.
In order to share your changes, you will have to add them. This has to be done for new, modified and deleted files, and will add them to the list of files you would like to share your modifications for: git add new_file1.txt modified_file2.jpg. Note that this can also be directories, and that you can add multiple files at once!
Now let's make it official! By committing your edits, you are required to describe them in order to allow others to understand them: git commit -m 'I did some modifications in order to solve this and that problem'. Please be informative and concise at the same time.
Your local copy has been changed, now push the changes online to all other people working on the repository: git push. That makes it official, and you can see it online.
Due to the disadvantages of this workflow, you shouldn't let pass too much time between the first and last step in order to avoid conflicts with potential edits of other people. Also, please make sure to double-check your edits since there is no check in between.
Schematic illustration
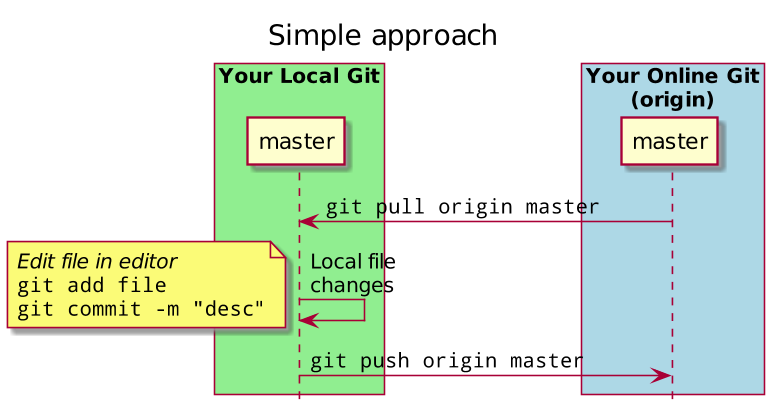
This roughly is the structure of the approach explained above:
Complex approach
The complex workflow is recommended for intensively used repositories which are affected by many changes by multiple users. You will not work on the official repository directly but on your own copy ("fork") and ask a maintainer to include your changes to the official repositories in an extra step. Also, you can contribute to any public repository even if you don't have write access.
This guide is also written in a more verbose form than the simple approach. even if you feel confident that you are not required to know the advanced workflow, it probably will still help you to understand Git a bit better.
Basic knowledge
The three repositories
As a beginner, you only really need to know about three repositories that are relevant to you, and that you will interact with. For this guide, we will assume that we are working on fsfe-website. The three repositories are:
The main remote repository or upstream: https://git.fsfe.org/fsfe/fsfe-website. This is the most important repository, because everyone has agreed that this is the "official" repository.
Your remote repository or origin: https://git.fsfe.org/YOURNAME/fsfe-website. This repository is created when you click on the "Fork" button on the main repository's web page. At the time of pressing that button, it is basically identical to the main remote repository. But when changes are made to the main remote repository, those changes are not made to your remote repository, unless you manually push the same changes. This repository contains all the commits that you have made. You have complete control over this repository, and you can do with it as you like!
Your local repository. This is the directory on your local computer. You also have complete control over this repository. Nothing you do in this repository affects any other repository until you push.
These three terms will consistently be used in this guide. However, in the simple guide, the forked origin is not used as you are directly working on the main repository.
Branches
In Git, you will often be using branches. When you first visit a project's web page or first clone a project, you will see the master branch of that repository. This is the main branch in any repository.
Consider a branch like an independent alternate timeline of commits, where the master branch is the main timeline. So if you create a new branch from master, you are entering an alternate timeline that, from that point onward, is not affected by changes in master. You can merge that timeline back into master, though this is often done by the maintainer of the repository.
Similarly, when a new commit is added to the master branch of the main remote repository, that commit does not immediately appear on the master branch of your remote repository. You have to manually update this. This makes sense, because your repository is independently your own, and nobody else's.
You usually do not edit the master branch directly. Ideally, the master branch is identical between the main remote repository, your remote repository and your local repository, so that all repositories agree on the official series of commits. If you edit your own master branch, you are basically disagreeing with the main remote repository and creating your own "official" timeline. Which would be fine, if you were writing an alternate history novel, but you probably want to stick to the official master branch.
Workflow
This guide is way to create a new pull request, i.e. a proposal for an addition or change of yours to the upstream repository, mostly via the terminal. This solution is preferred over using graphical applications, because it is easier to ask someone to type a certain command, than it is to ask them to push some buttons.
Set up your repository
![]() Please, keep in mind that for setting up git and cloning repository you will need from 2 to 3 hours of time! So it's better to do this when you come to the office in the morning.
Please, keep in mind that for setting up git and cloning repository you will need from 2 to 3 hours of time! So it's better to do this when you come to the office in the morning.
Assuming you have set up your remote repository by clicking the "Fork" button on the main project page, you can now set up your local repository.
mkdir -p ~/FSFE  # Create a directory to hold your local repositories
cd ~/FSFE

# Create your local repository by downloading your remote repository.
git clone git@git.fsfe.org:YOURNAME/fsfe-website.git
cd fsfe-website
Also, by cloning, you have implicitly configured a "remote" for your local repository. This remote is called origin, and is equal to "git@git.fsfe.org:YOURNAME/fsfe-website.git". You might want to add an extra remote, however, pointing to the main remote repository. Let's do this now, and call it upstream.
git remote add upstream git@git.fsfe.org:fsfe/fsfe-website.git
Syncing all repositories
Before you start, you may want to synchronise all repositories so that you are working on the latest version of the main remote repository (upstream).
git checkout master       # Switch to the main branch.  This is a branch in your
                          # local repository.
git pull upstream master  # Pull the latest version of upstream into your local
                          # branch.
# Your local repository is now up-to-date!

git push origin master    # Let's also push the changes to your remote repository.
                          # This is not strictly necessary.
Start on a new feature
Let's begin changing something, e.g. adding a new translation. Assuming that your local repository is up-to-date, you can create a new branch from master. We never make any changes directly to the master branch.
git checkout master              # Make sure we are starting from master.
git pull upstream master         # Synchronise your master branch with upstream
git checkout -b NAME-OF-FEATURE  # Create a new branch from master, and change
                                 # to it.
At this point, you leave Git alone and begin working on your changes. You only return to Git after you are done.
When you are done, you add files to the staging area. This is basically a list of files that you would like to commit all at once. Everything outside of the staging area is not committed. When the staging area is properly populated, you can commit. By committing, you are basically declaring that you are confident in your changes, that they form a single cohesive whole, and that they are more-or-less complete.
git status  # Let's have a look at what branch we are on, and what files have
            # been changed.
git diff    # Let's see what exactly was changed.  Press 'q' to exit.

# Let's add files to the staging area.
#
# Use `git add FILE` to add to the staging area.
# Use `git reset FILE` to remove from the staging area.
git add path/to/file/that/changed

# When you are done setting up your staging area, you can commit.
git commit -m "MESSAGE DESCRIBING YOUR COMMITS"
Sharing your changes
If you did the above, you have now added a commit to a branch in your local repository. But you want to eventually get that commit into the master branch of the main remote repository. To do that, you have to follow a few steps.
First, you upload the branch with commits to your remote repository (origin).
git checkout NAME-OF-FEATURE     # Make sure we're on the correct branch!
git status                       # Double check whether everything is good.
git push origin NAME-OF-FEATURE  # Upload your branch to your own remote repository
When you go to https://git.fsfe.org/YOURNAME/fsfe-website, your commit should now be visible in its own branch! This is good, because it means that your change is available online, and that others can view it. This also means that the maintainer of the main remote repository can view your changes.
To ask the maintainer to pull your branch into the master branch of the main remote repository, you create a pull request. You do this by navigating to the main webpage the main remote repository and clicking on "Pull Requests". There, you can create a new pull request and specify that you would like the maintainer to update master (main) with NAME-OF-FEATURE (compare). Add a title and a description, and your work is done :-). The maintainer will review your changes and accept them when everything is okay.
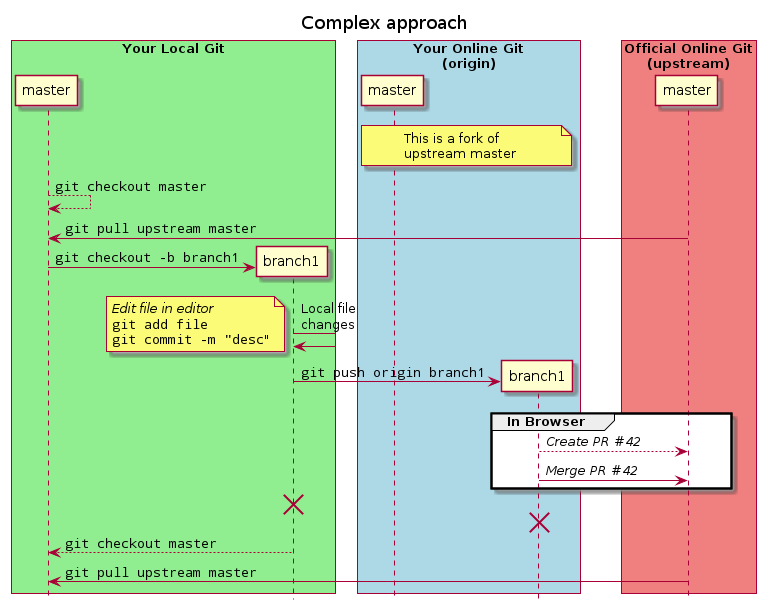
Here is how the above step looks like schematically:
There is one downside though: Maintainers and other people cannot easily add their modifications to your changes, e.g. when they found a typo or want to add an improvement, so they can only add comments. This is because all changes are in a branch in your own remote repository (origin). In the next step, you'll find a way how to change that but it requires some more privileges.
Sharing your changes and allowing contributions
There is a variation to the prior section when it comes to sharing your changes. It allows other people to contribute or even alter commits to your branch. The trick is that instead of pushing changes to your own remote repository (origin), you push these to a separate branch on the main remote repository (upstream).
However, the main remote repository does not allow everyone to create new branches or change it in another way. For the FSFE website, all staff and some translators, webmasters and core team members have this permission. If the following commands do not work for you, and you think that they would ease your work and collaboration, please contact the Web team.
In principle, the process is the same as above, but the last command (git push ...) differs:
git checkout NAME-OF-FEATURE       # Make sure we're on the correct branch!
git status                         # Double check whether everything is good.
git push upstream NAME-OF-FEATURE  # Upload your branch to the main remote respository
You will be able to create a pull request either from within the response on the command line, or from https://git.fsfe.org/FSFE/fsfe-website/pulls/. Just search your branch and create a pull request.
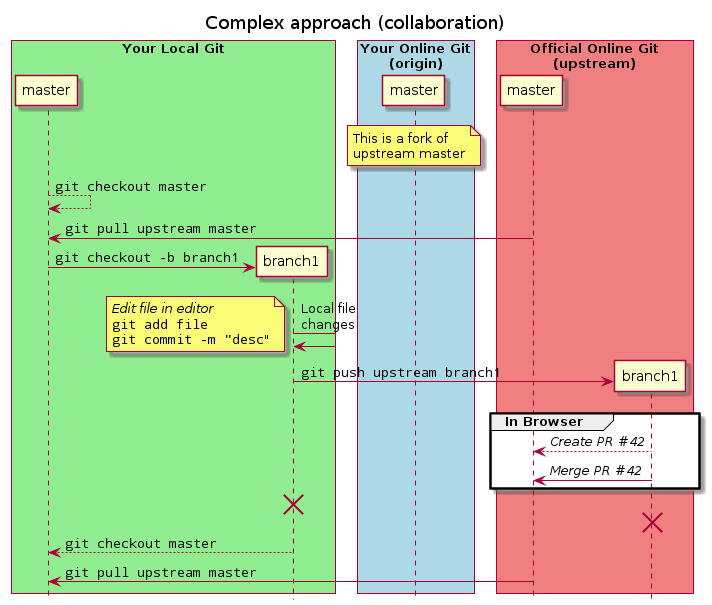
Here is how the above step looks like schematically:
Now, others can contribute to your branch – see the next section for how to do that.
Contribute to an upstream branch
To add commits to a pull request that has been created as explained in the section above – so with a branch on the main remote repository (upstream) – you need the same permissions as for creating it. Again, if you require them, please contact the responsible team.
To find out whether a pull request is created this way, go to the pull request page and read the line below the title. The examples here are the PRs #1245 and #1261.
A pull request created from a fork (so from someone's origin) may look like the following: [...] from 'eal/fsfe-website:eventmarch' into 'master'. This shows you that the pull request originates from the branch eventmarch by the user eal. Unfortunately, it is usually not possible that you can contribute to this branch.
A pull request created inside the main remote repository (upstream) however looks like this: [...] from 'small-build-fixes' into 'master'. There is no indication of a user here, so the branch is directly on FSFE/fsfe-website. So the following procedure is possible.
The idea is simple: Find the new branch on the main remote repository (upstream), check it out, add your commit, and push it back upstream.
git fetch upstream                 # Look for new branches on the main remote repository
git checkout NAME-OF-FEATURE       # Check out the branch of the pull request, e.g. "small-build-fixes"
# Make your changes, add them, and commit them as usually
git status                         # Double check whether everything is good.
git push upstream NAME-OF-FEATURE  # Upload your changes to the branch of the main remote repository
Now you can check the pull request online again and will see your commit(s) in the Commits tab. Done!
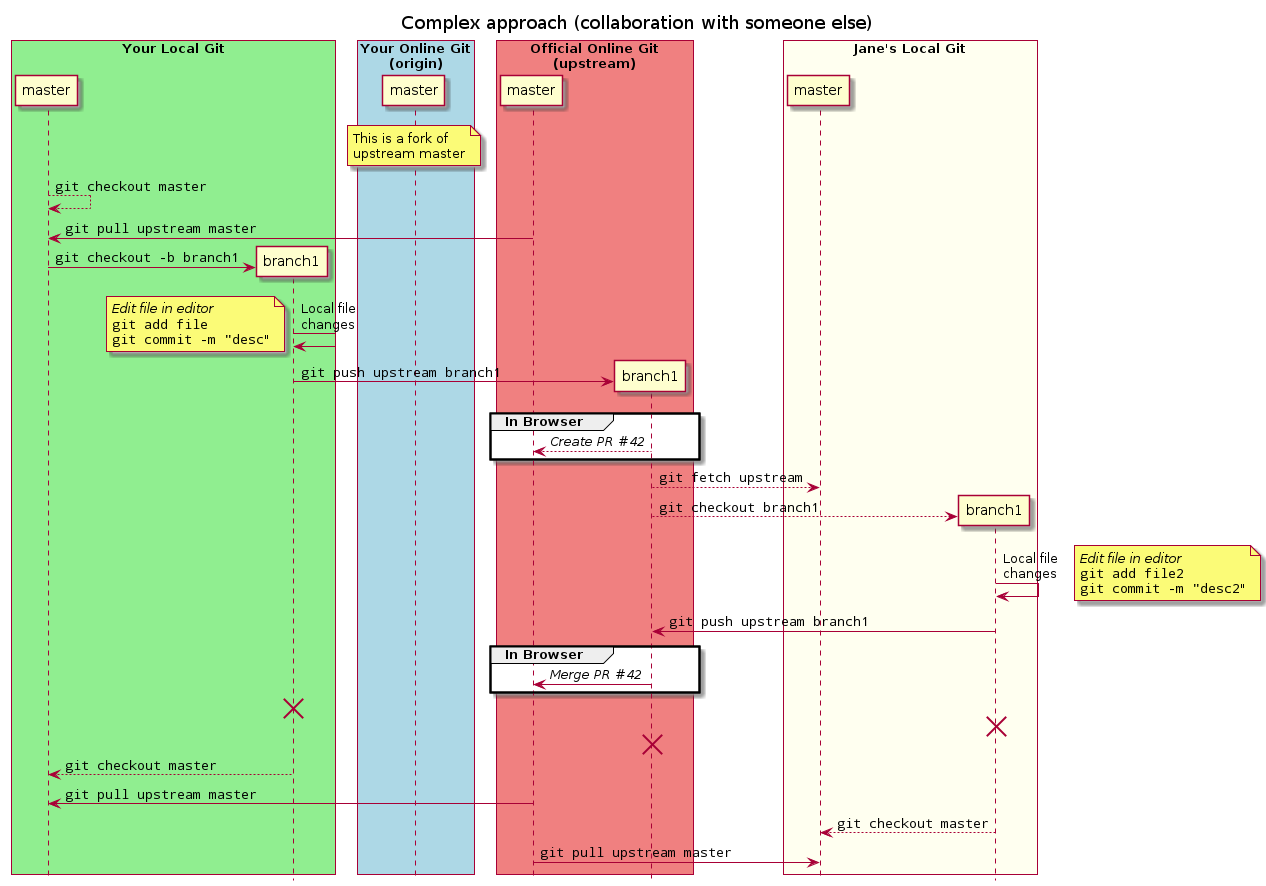
In the end, this whole process looks a little like that, imagining that Jane contributes to your pull request:
Helpful commands
Below an uncomplete list of commands that prove to be useful.
git status: Always helpful to help you understand your latest edits. It also shows the branch you are currently working on
git log: Which changes took place in the past in this repository? Will show all commit messages, and with the unique identifiers of each commit you could explore more details.
git diff: Show a detailled difference log between the last official status and potential edits of yours which have not been committed yet.
Inline comments on Pull Requests
1. Go to the Pull Request and go to Files Changed. 2. Select the part you want to comment on. There should be a green plus '+' on the side. Klick on this one and comment. Now you can type your comment.
- After the first comment you have to klick on 'Start review'
3. Now, you will have a new interface and can make more comments. 4. After you are done: klick on 'Request changes'
Note: When you went through the comments on your 'Pull Request' and changed the file(s) please klick on 'Reply' to notify the reviewer of your 'Pull Request'. Only committing new files won't notify the person reviewing the 'Pull Request'. But you don't need to reply to every comment just chose one and say that you are done.
Questions
This guide is, and will probably always be, incomplete. Git is a very advanced piece of software. If you run into a problem that this guide does not explain, please ask a technically inclined person to add a section to the guide that sufficiently explains how to deal with that problem.
There are also very many guides on how to use Git on the internet. A visual guide to version control and its whole series explain it from a more non-technical side. Atlassian and GitHub have some very detailed tutorials that may help you with more specific things.


